How to Schedule TikTok Posts in 2026: Phone, Desktop and TikTok Studio
Schedule TikTok posts natively on desktop, in TikTok Studio and on your phone in 2026: creator-account rule, the 30-day limit, no edits, and when a scheduler wins.
Most TikTok advice ends with "post consistently", and most creators try to do that by remembering to open the app at 6 p.m. every day. It works for a week. Scheduling is what makes it work for a year, and TikTok has quietly made it possible to do that for free, with some limits that catch people out.
The short version for 2026: TikTok lets you schedule posts natively from the desktop upload page and from TikTok Studio, on the web and in the TikTok Studio phone app, as long as your account is a creator or business account. You can schedule up to 30 days ahead, you cannot edit a scheduled post once it is set, and the native scheduler only posts to TikTok. A third-party scheduler removes those three limits and lets you line the TikTok copy up with Reels and Shorts. This guide covers both routes, step by step.
Before you start: switch to a creator or business account
Personal accounts cannot schedule. Everything below assumes you have switched, which takes a minute and costs nothing:
- Open TikTok, go to your Profile, and tap the menu (three lines) in the top corner.
- Tap Settings and privacy, then Account.
- Tap Switch to Business Account or, under Creator tools, the option to switch to a creator account.
- Pick a category and confirm.
The two account types differ mainly in the music library (business accounts are limited to commercially licensed sounds) and in the analytics they unlock. For scheduling, either one works. If you make money from brand deals, the creator account keeps the full sound library and is the safer choice.
Method 1: Schedule from the desktop upload page
This is the original native route, and it is still the simplest if you edit on a computer.
- Go to tiktok.com in a browser, log in, and click the Upload button (top right, or in the left menu).
- Drag in your video. TikTok accepts the same files it does on the phone; for the exact specs see the video specs cheat sheet.
- Write the caption, add hashtags and mentions, and pick the cover frame.
- Scroll to Settings and turn on the Schedule toggle.
- Choose the date and time. The picker runs in the time zone your computer is set to, so check that before you confirm.
- Set who can view the video and whether comments, duets and stitches are allowed. These cannot be changed later without deleting the scheduled post.
- Click Schedule.
The post now sits in your profile with a scheduled label, and in TikTok Studio under Posts. At the chosen time TikTok publishes it exactly as if you had tapped Post.
Method 2: Schedule in TikTok Studio on the web
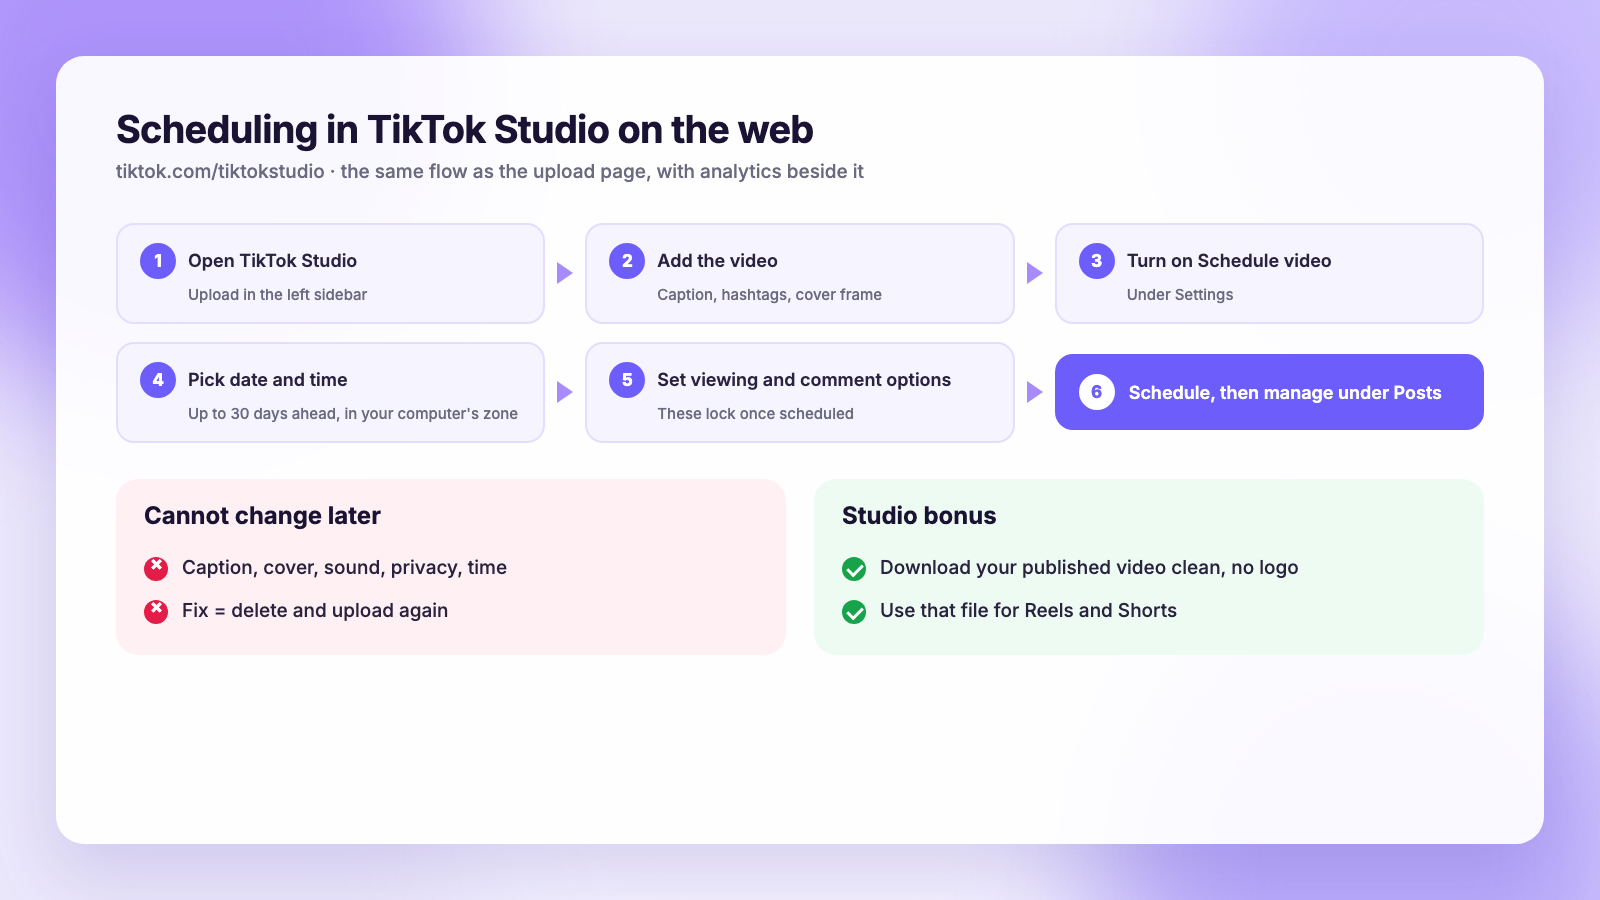
TikTok Studio is the creator dashboard at tiktok.com/tiktokstudio. It wraps the same upload flow in a page that also shows your analytics, which makes it the better place to work if you schedule more than one video at a time.
- Open TikTok Studio and click Upload in the left sidebar.
- Add the video, caption, cover and settings exactly as above.
- Turn on Schedule video, set the date and time, and confirm.
- Go to Posts in the sidebar. Scheduled videos appear with their publish time, and this is where you delete one if you need to change it.
Studio also has a Download option on your published videos. That matters for cross-posting: the file you get here is clean, without the TikTok logo that the in-app Save button burns in. Our guide to cross-posting Reels, TikToks and Shorts without watermarks builds on exactly that.
Method 3: Schedule on your phone with the TikTok Studio app
For a long time the answer to "can I schedule on my phone" was no. The TikTok Studio app changed that. It is a separate app from TikTok itself, free on iOS and Android, built for creators who want analytics and post management without the For You feed in the way.
- Install TikTok Studio from the App Store or Google Play and sign in with your TikTok account.
- Tap the plus button to start a new post, or open a draft you saved in the main app.
- Trim, add text, pick a sound and write the caption as usual.
- On the post screen, turn on Schedule, then choose the date and time.
- Confirm. The scheduled post shows under your content list with its publish time.
The main TikTok app still has no schedule toggle on the post screen as of November 2026. If you only use the main app, you will not find it. Install Studio or use a browser.
The three native limits that catch people
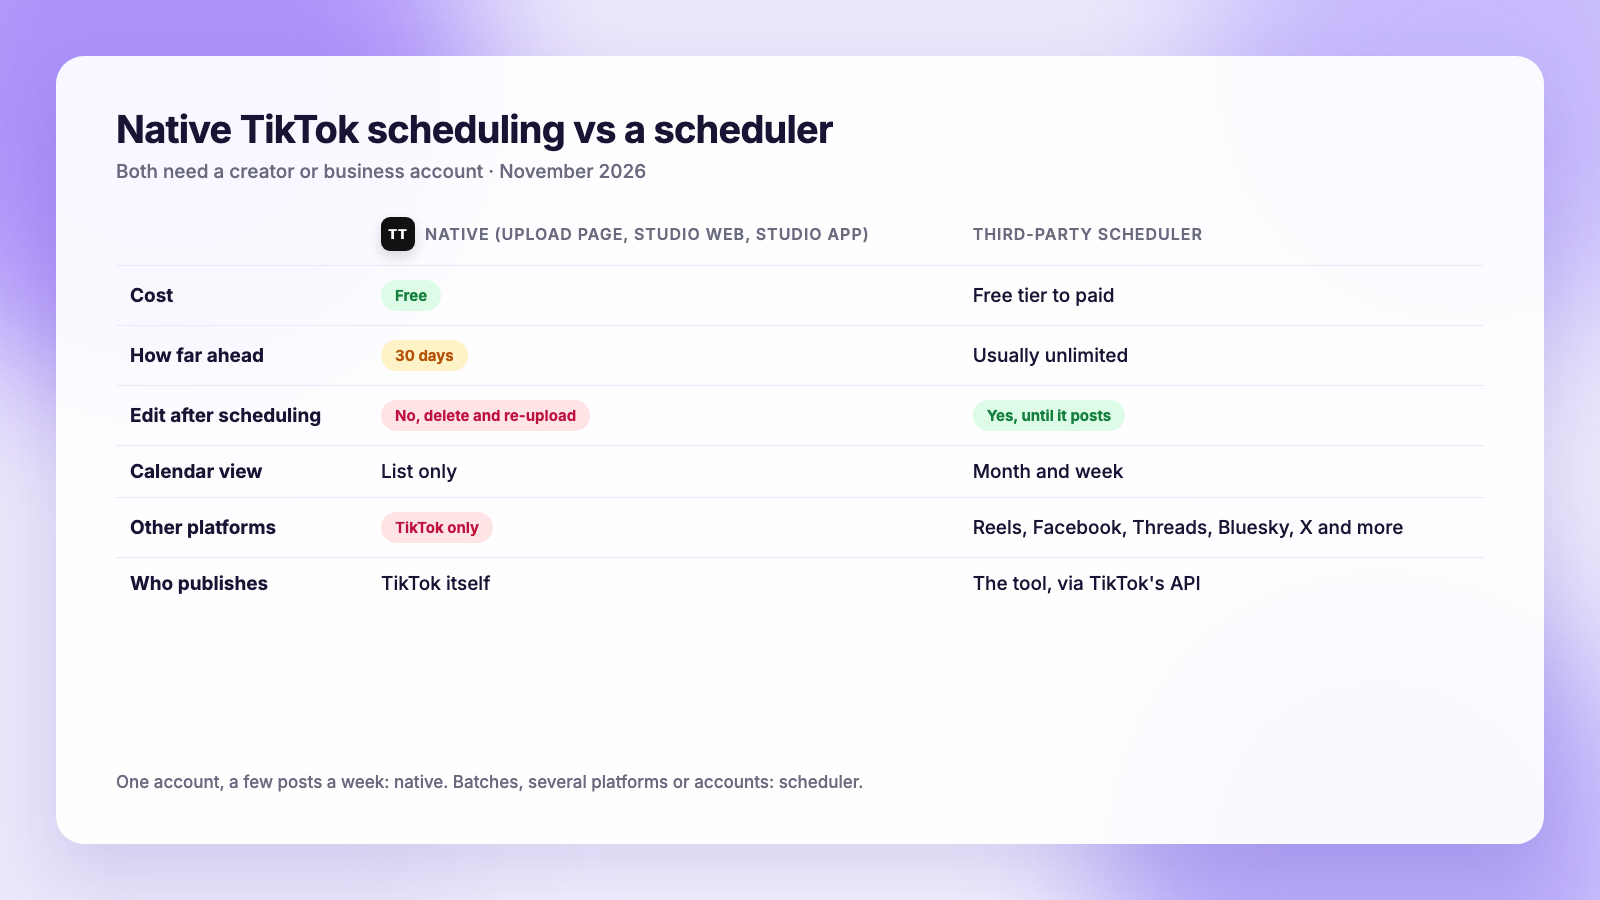
Native scheduling is free and reliable, and TikTok publishes the video itself, so there is no risk of a connection failing. But three limits shape how you use it.
1. Thirty days ahead, no more. The date picker stops 30 days out. If you batch a quarter of content in one weekend, as we recommend in the batch-filming guide, the last two months have nowhere to go. Keep them as drafts or in a scheduler.
2. No edits once scheduled. You cannot change the caption, cover, sound, privacy settings or time of a scheduled post. A typo means deleting the post and uploading again from scratch. Proofread before you hit Schedule, and read the caption aloud once.
3. TikTok only. The same video almost always belongs on Instagram Reels and YouTube Shorts too, and often on Facebook, Threads and Bluesky. The native scheduler cannot send it anywhere else, so you end up scheduling the same clip three or four times in three or four apps.
| Native (upload page, Studio web, Studio app) | Third-party scheduler | |
|---|---|---|
| Cost | Free | Free tier to paid, depending on tool |
| How far ahead | 30 days | Usually unlimited |
| Edit after scheduling | No, delete and re-upload | Yes |
| Calendar view | List only | Month and week calendar |
| Posts to other platforms | No | Reels, Shorts, Facebook, Threads, Bluesky, X and more |
| Needs creator or business account | Yes | Yes (TikTok requires it for API posting too) |
| Who publishes | TikTok itself | The tool, through TikTok's API |
When a third-party scheduler is the better tool
If you post to TikTok and nowhere else, three times a week, native scheduling is all you need. Stop reading and go switch your account.
If any of these describe you, a scheduler earns its place:
- You batch more than a month of content at once.
- You post the same clip to Reels and Shorts and want one calendar for all of it.
- You run more than one TikTok account, or client accounts.
- You want to fix a caption without re-uploading.
- You want each platform to publish at its own best time rather than all at once.
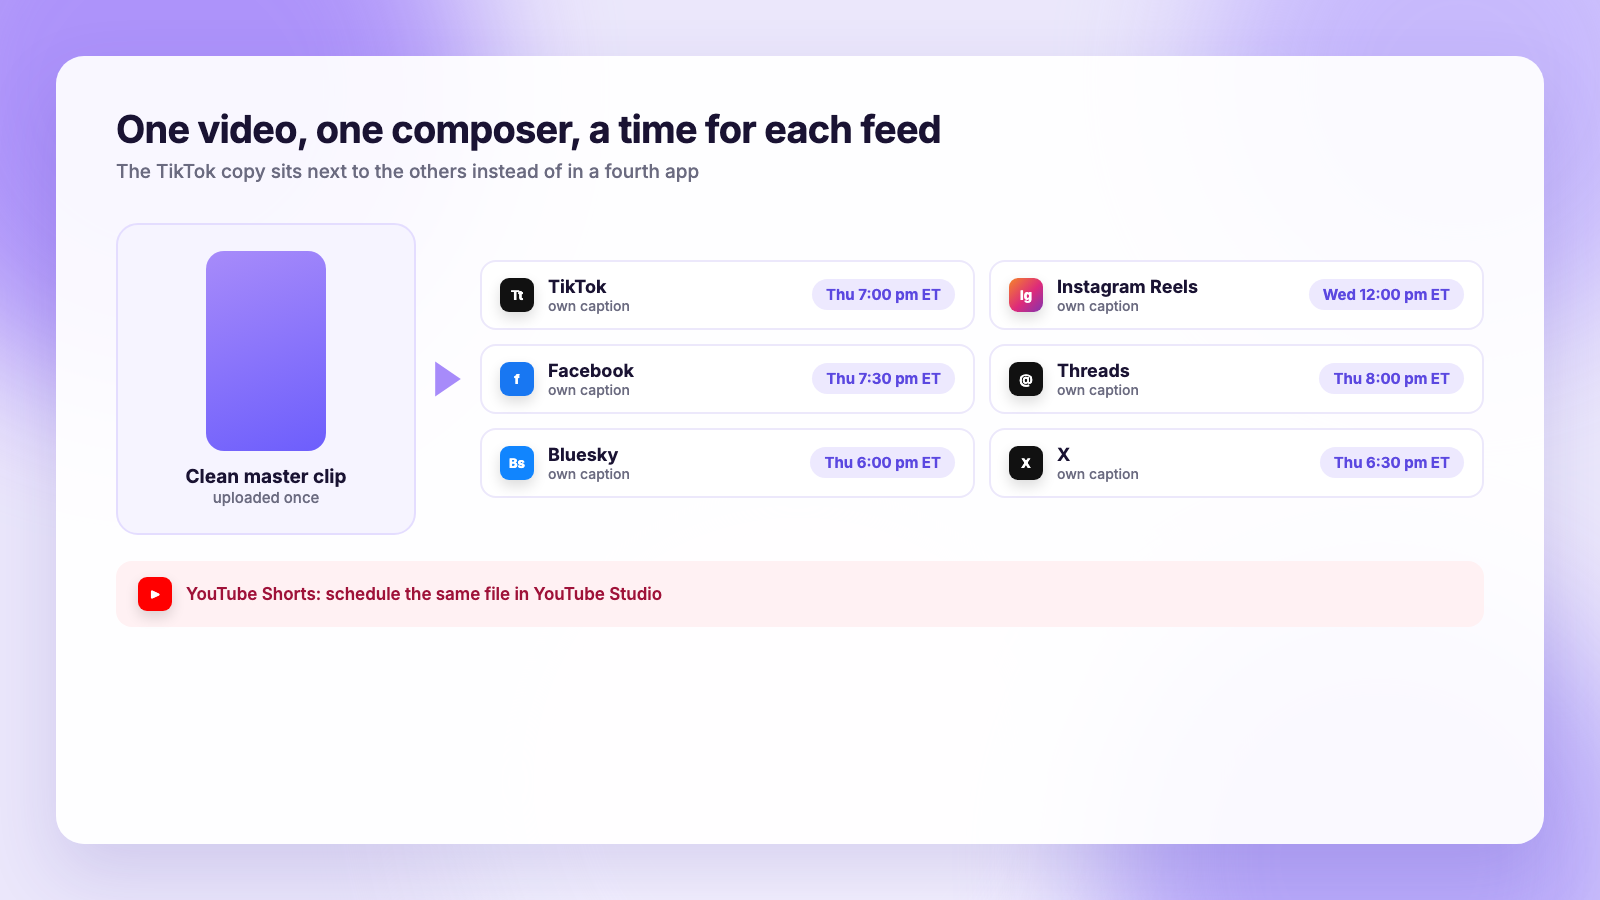
The workflow with a scheduler is: connect your TikTok account through TikTok's own login screen, upload the clean master video once, write a caption, and pick a time for each platform. The tool holds the video and submits it to TikTok at the scheduled moment. In Plumefy, you add the TikTok copy to the same post as the Reel, the Facebook version, the Threads post and the Bluesky post, with a caption and time for each, and the composer checks each caption against that platform's limit. YouTube Shorts is not on that list; for the Shorts copy, use the scheduler inside YouTube Studio, as described in how to schedule YouTube Shorts. If you want to compare tools before choosing, our Buffer comparison and Publer comparison go through pricing, TikTok support and the free plans side by side.
One honest caveat about every third-party tool, Plumefy included: TikTok's API has its own rules. Videos posted through it must be fully processed before the scheduled time, some sounds from TikTok's library cannot be attached from outside the app, and TikTok can hold a video for review before it goes public. For most creators that is invisible. If you rely on trending sounds added in the app, post those natively and schedule the rest.
What scheduling does and does not change
Scheduling changes when your video goes live and how much of your week you spend in the app. It does not change how TikTok ranks the video. A scheduled post gets the same initial test audience as one you tap Post on, and the For You feed judges it on watch time, rewatches, shares and comments exactly the same way. The persistent myth that scheduled posts are "throttled" comes from people who scheduled at a bad time and compared it with a manual post at a good one. Fix the time and the gap disappears.
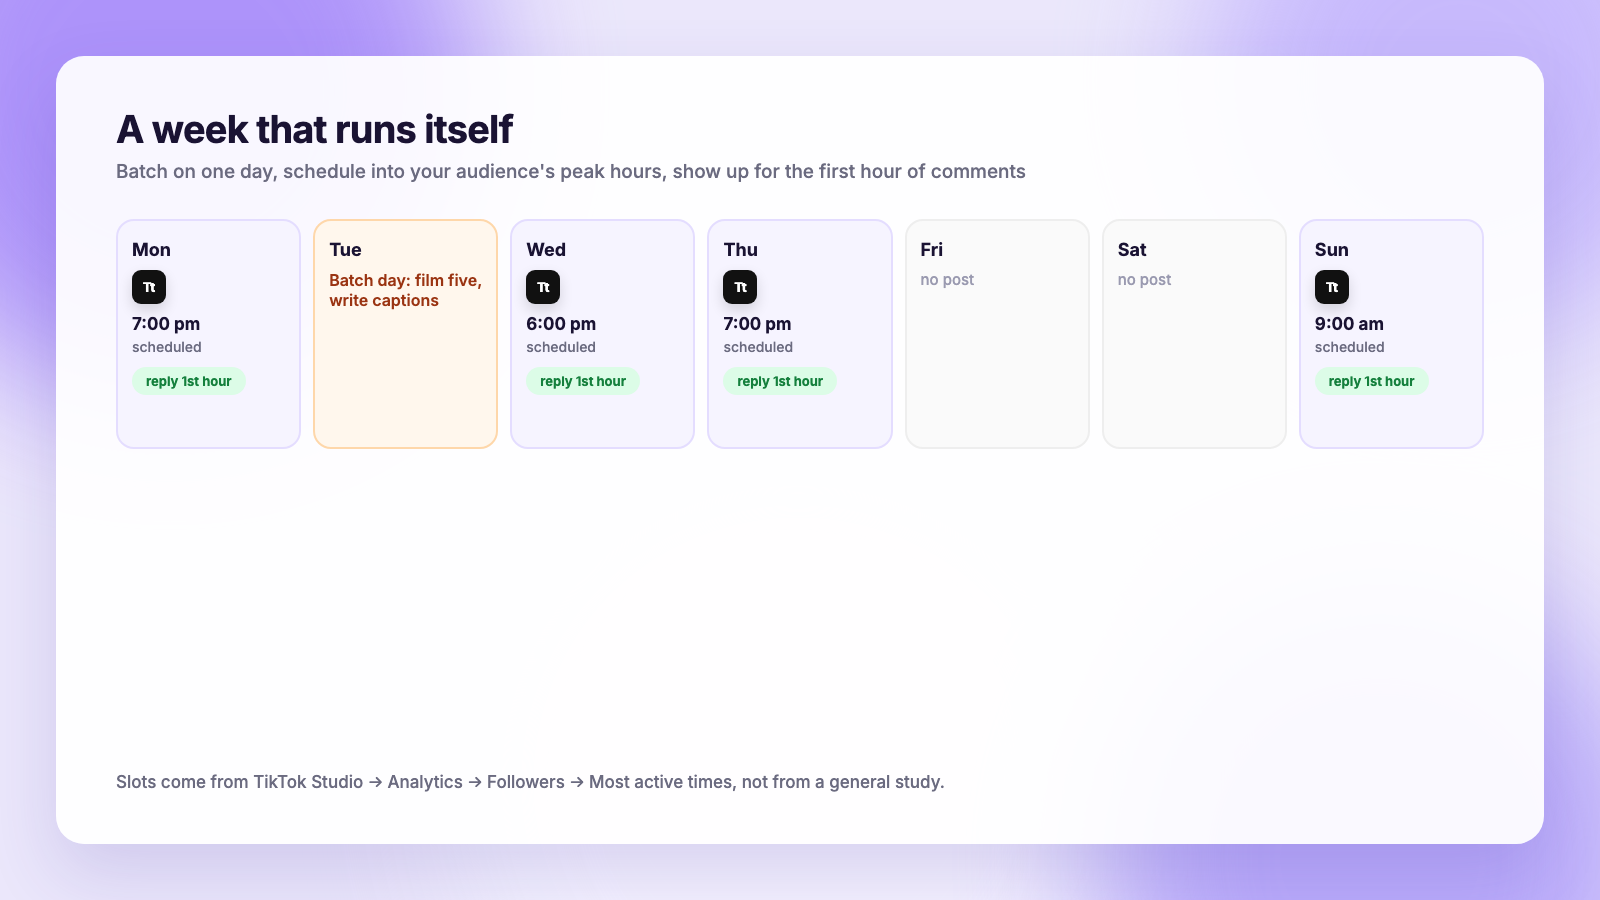
Which means the time still matters, and it is the thing scheduling lets you control. Our best time to post on TikTok guide breaks down the 2026 data by day, and TikTok Studio's own Analytics → Followers tab shows when your specific audience is online, which beats any general study. Pick the slot, schedule into it, and spend the time you saved replying to comments in the first hour, which is the one thing a scheduler cannot do for you.
FAQ
Can you schedule TikTok posts on a personal account?
No. Native scheduling, and posting through TikTok's API, both require a creator or business account. Switching is free and takes a minute under Settings and privacy → Account.
How far in advance can you schedule a TikTok?
Thirty days with TikTok's own scheduler, on desktop or in the TikTok Studio app. Third-party schedulers have no such limit.
Can I edit a scheduled TikTok?
Not natively. You have to delete the scheduled post and upload it again with the fix. Most third-party schedulers let you edit the caption, cover and time until the moment the post is submitted.
Does scheduling hurt reach on TikTok?
No. TikTok's ranking looks at how viewers respond to the video, not at whether a human tapped Post. Scheduled posts that underperform were usually scheduled at a quiet hour.
Pick the route that fits your week
One account, a few posts a week, no cross-posting: use TikTok Studio and schedule natively. A month or more of content at a time, the same clips on Reels and Shorts, or more than one account: put the TikTok copy in a scheduler next to the others and manage one calendar. Either way, the hard part is done the moment the video is in the queue, and the hour you would have spent opening the app at 6 p.m. goes back to making the next one. Plumefy's free plan covers six accounts if you want to try the second route.
Post everywhere, once.
Start on the free plan — no card needed, upgrade when you need scheduling.
Start free